|
|
|
|
House & Train Description

This house and train were built to raise money for Butterfly Children's Hospices: Nanjing.
Dough: Sugar Dough
Roofs: White royal icing covers; M&M shingles; candy cane hooks for fencing
Accents: M&Ms & Swedish Berries; white royal icing flourishes with No.1 piping
Window Candles - Red candles (No.3), yellow flames (No.2), green mistletoe (No.242), red holly (No.2), silver beads
Drop Strings - Sour apple and strawberry licorice strands
Front Doors - Sour apple and strawberry licorice strips, glued together; silver beads for door knobs
Porch Supports - Candy canes anchored by chocolate gifts and other candy canes
Side Porch foundations - 3 stacked Twizzled Twizzlers
Front Porch Foundations - Twisted marshmallows on top, twizzlers or Jolly Rancher Beads on the bottom
Side Supports - extra large candy canes
Wreaths - green (no.242), red holly (no.2) and silver beads
Cornelli Lace - yellow (no.1)
The Ingredients

I'm so glad I made the first tutorial. I've gone through and reread it and now know that I'll need 8 batches of dough and 6 batches of icing. I'm adding a small train set, so I think I'll probably need 9 batches of dough.
I've taken the amounts, reduced them to fractions, multiplied them by 9, then had a think about how many packages I'll need. Mr. Google has told me how many cups are in 2.2 kg of flour (about 9) and how many teaspoons are in 29 ml (4.9). I know eggs come in packages of 6, 12, or unknown large bags (I do, after all, live in China). I don't have an unopened bag of sugar, so I'm not sure how many cups come in a typical Chinese bag. Anyhow, these are the exciting challenges one faces when a metric baker using imperial measurements in a foreign country.
Note to Self - There was no flour available in my entire town, and I was too lazy to drive into Nanjing. I only made 7 batches of dough, and yet it worked out perfectly. I think the first time I made the gingerbread house, I must have made a lot of mistakes, because this time was fast, efficient, and used far less dough. After the house was done, I decided to make a thank you gift for the Design Technology teacher who helped me so much; I baked him a huge gingerbread cookie using Chinese dough and it tasted truly disgusting. As in, spitting out the cookie in my mouth, then binning both the cookie and the remaining dough. Same recipe, different dough.
Good Music is Essential
The best way to make a Christmas gingerbread house (okay, sugar dough, but ANYHOW) is to have the kitchen full of Christmas music. Here is my playlist at the moment:
Barenaked for the Holidays - Barenaked Ladies
12 Days of Christmas - Bob & Doug Mackenzie
(Sorry, if you are seeing a decidedly Canadian slant to this playlist, there's a definite reason).
The Gift Goes On - Sandi Patti
A Christmas Together - John Denver & The Muppets
Colinda - MV Studio (Romanian carols. Very cool! I used to live in Romania.)
Christmas Lights - Coldplay
Gingerbread Train
There's a website called Costume Pastimes in which the owner has created a gingerbread page dedicated to Good Housekeeping magazines. I had forgotten, but every winter, Good Housekeeping would do an issue dedicated to gingerbread houses. The lady running this website collected past issues and uploaded them as PDFs. Thank you, Costume Pastimes, for doing this! I've resized the pieces to 1 square = 1 inch using Illustrator. The pieces look really small, which is a little concerning, but hey, let's give it a go. I've also scoured the internet for other gingerbread trains to use as examples / inspiration.
I'm uploading my files. GHK didn't include all the pieces - for some it just said, "Cut two pieces that are this size, cut four pieces that are that size..." So I'm uploading my Illustrator file so that you can enlarge them to which ever size you prefer. BTW, if you don't have Illustrator, these files can probably be opened by CorelDraw as well.
I'm uploading my files. GHK didn't include all the pieces - for some it just said, "Cut two pieces that are this size, cut four pieces that are that size..." So I'm uploading my Illustrator file so that you can enlarge them to which ever size you prefer. BTW, if you don't have Illustrator, these files can probably be opened by CorelDraw as well.
|
|
||||||
Schedule
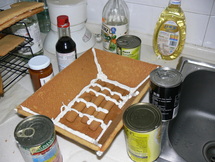
Sunday, 25Nov (2 hours): Baked. The dough needs to be in the fridge between 1 hour and 3 days, so I'll need to be baking on Wednesday at the latest.
Wednesday 28Nov (4 hours): I changed my schedule because I was worried about baking too early and having the cookie go stale. Also because our school just finishing putting on their production of Kiss Me Kate and I've been incredibly busy. I know from experience that I must do the two roofs today. Those are the emergencies. I need to get them assembled by tomorrow night so that they can dry on Friday and be ready for the weekend.
Thursday 29Nov (2 hours): Assembled the two roofs, baked all the PM pieces except for those containing windows.
Friday 30Nov (5 hours): Baked the train barrels, PM pieces with windows, and re-enforced the PM roofs.
Saturday 1Dec: Decorated the roofs; ran wiring through the roofs
Sunday 2Dec: Assembled the PM house; decorating PM's final touches
Tuesday 4Dec: Added colour-flow royal icing to the sides of the train carriages; decorating PM's final touches
Wednesday 5Dec: Assembled the train carriages
Thursday 6Dec: Attached wheels to the train carriages
Friday 7Dec: Repaired engine and caboose under-carriages; Added piping accents to train and house; created fondant babies for the train; Added roofs to main structure and prayed.
Dec 8: Landscaped the platform and created the snowman
Pieces need to be rolled to the thickness of 1 cheap, disposable chopstick from the local underground market. Yes, non-China based people will have no idea what I'm talking about, but really I'm taking notes for myself. I originally used pencil-thickness and started over again because they were obviously too big. Bake the thin ones for only 10 minutes and they'll be pretty much perfect coming out. I did the engine platform with a pencil thickness and it needed 12 minutes instead. Pieces containing windows - 12 minutes, then cut out the windows and trim the template, then 7 minutes.
Picture Perfect Windows
I put the paper template on immediately after coming out of the oven. I used a dull knife to outline the windows, then cut the outside to match the template. Took the paper off, then used an off-set spatula to dig out the windows. I used my finger to press the window frames back into place. The dough was still wet and sticky enough that the extra bits were incorporated in with no problems. I then filled the holes completely level with crushed hard candies and popped it back into the oven. I had an assembly line going so that I always had one on top of the stove getting prepared while the other was in the oven having the hard candies melted down. I always had to wait upon taking the walls out of the oven, though, because you can't move freshly melted candies - they stick to the spatula. You've got to wait until the candies are cold before moving anything. That's why I keep 3 oven racks going at a time.
|
|
Stabilising the Roofs
I waited a full 24 hours before flipping the big roof of the Phantom Manor. Once over, I re-enforced the flat edges with icing sugar. I was interested to see a gap between the diagonal edges when I realised that the roof was actually pulling apart. I propped it up with more cans and started "gluing" those sides as well. I noticed when it was right side-up that the top was beginning to cave in the middle I baked thin dough strips, then glued them inside the flat of the roof. Therefore, I couldn't flip the roof over again because that new icing would fall off. So at the moment, the roof is defying gravity with the help of many cans and I am hoping and praying that my extra icing and beams work. I've also re-enforced the widow's roof, though it was unnecessary as it's very light and very stable.
Stabilising the Walls

The good news is that this gingerbread house was far, FAR more stable than the last one. I think because this one had a lot of candy canes, which are extremely hard. Even still, the amount of candies on this candy house posed their own structural problems.
The roof had an insane number of candies, and just from lifting it to place the wiring, I knew that the house would be hard pressed to support such a monstrosity. I went to the maths/science department and got loads of advice about determining angles, then determining the opposite angles and baking specific gingerbread pieces. Blah blah blah. Confusing and a little scary. Then I went to the Design Technology teacher and was simply told to strengthen the walls, both inside and outside, using candy canes. So here's the picture before my roofs went on. These candy canes are approximately 2 cm in diametre and so are super strong. I've got 3 inside and 3 outside. I couldn't add 2 more because they'd either cover the windows or the porch wouldn't allow it. This did mean that one side of the house was more stable than the other.
When I finally added the roofs, on Friday, the house literally started to fall apart right in front of me. I stood in front of it, watching the walls buckle and churn. I sent panicked emails to friends, saying, "I can't believe it! It's buckling right in front of me!" But at some point, it stopped. Then I filled the spaces using even more royal icing. After that, the house was rock hard and nothing (not even a Chinese moving van without shocks) could shift any part of it.
Running the Wiring
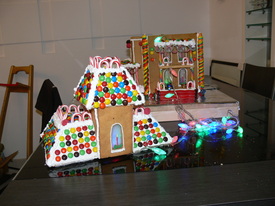
The last time I did a house, I didn't remember about the 3rd story tower and wasn't able to run lights up there. This time, I swore that I would light the entire house, so I purposely cut a hole in the main roof and then ran my wiring up before the tower roof went on. I thought I was so clever. Then I put the house together and discovered that I hadn't run wiring through the main tower on the bottom floor. Very carefully, I cut a hole in the main structure, behind the front tower. The length of lights was a very good length, so I ran all my wiring through beforehand to make sure that everything would fit. I had to thread the lights through the main tower and then back out again. I had to made sure the end of the wire was in the top tower. When everything was lit, I then carefully lifted the roofs on and attached them. The good news was that I could instantly see where the lights were leaking out of the house and fill those spots with icing. So a tiny set-back, but in the end every single window was lit, so I was really happy about that.
The Train Barrel
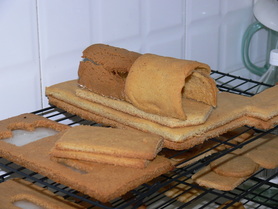
Train barrel. This was a big experiment. I rolled a tomato paste can on thin dough, cut it out, then wrapped it over a tin foil lined can. Stuck it in the oven for 12 minutes. When it came out, part of it had melted. No problem! I took my knife and cut off the edges at the bottom, then took my offset spatula and rounded it back into a circle. Because the dough was piping hot out of the oven, it naturally sprung into place, giving a nice, rounded edge on the top and sides. The bottom was flat because of resting in the oven, which is also really great. When I cut them out, they both broke. I let the train side at the side while I finished the gingerbread house, knowing that the house was more important in the long run. The problem was that gravity took its tole and the barrel pieces broke. Then I did them again and they broke. Part of the problem was the weight on the can. If I made the dough too thin, they they broke coming off the can; if I made them too thick, they slid off the can. I never did get the perfect consistency of dough -- In the end, I just propped up the broken pieces together, glued them using browned royal icing, and then made a matching pattern on the other side.
Assembling
The most important lesson I learned about the train (and Amy, read this very well next year!) is to assemble the walls first and then the floor later. I tried to assemble the walls and floors of the train carriages all at the same time and it was a massive disaster. However, I discovered that I could put together the walls first and then let them rest. Then add the bottom afterwards. The bottoms never fit perfectly, which was the main problem. Trying to put together at the same time only expounded on the problem. However, if you put the bottom on last, then it doesn't matter whether there is a gap of a few milimetres because the box is going to be filled with candies and stuff anyhow. The second most important rule I discovered was that you need to decorate the fiddly parts of the train last. Sure, you need to do the colour flow first, but the wreaths and other decorations need to be done last. It's really miserable trying to fit a chassis and wheels on while trying to protect 3D wreaths.
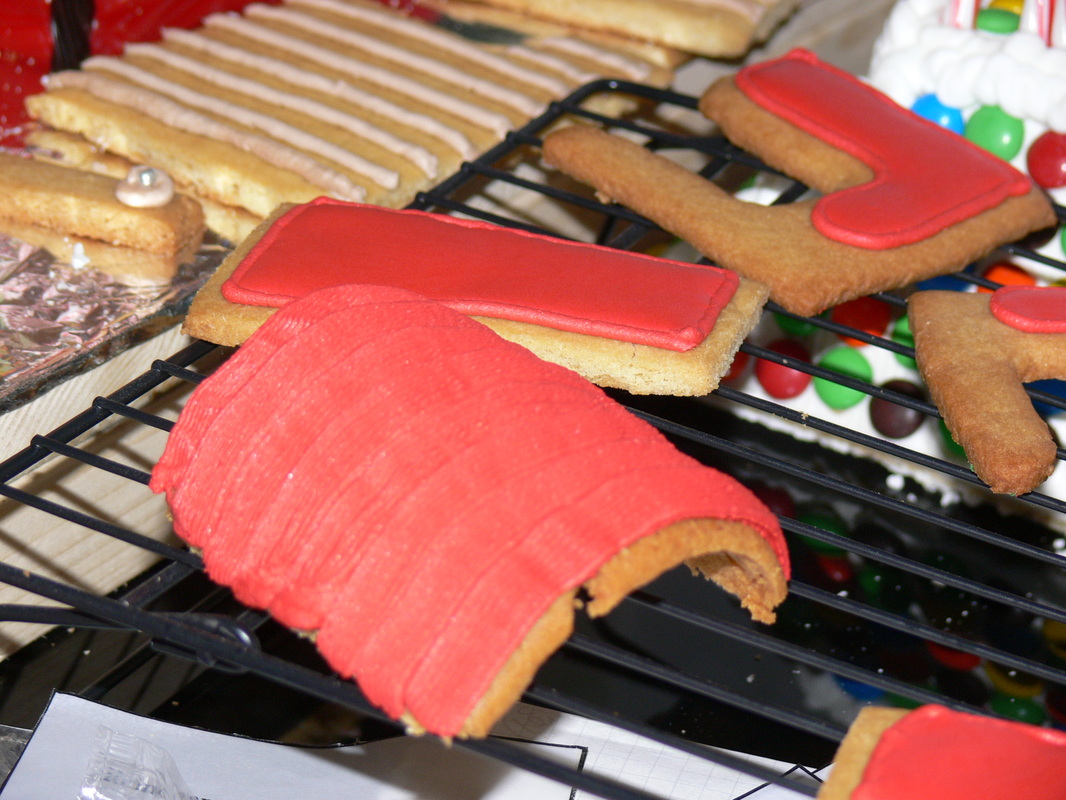
Colour Flow Icing
When I did my Wilton course, I used a proper product called Colour Flow. What I didn't realise was that you can use royal icing to mimic the technique of colour flow. I wanted to have the sides of my gingerbread train and its windows be really smooth. After tinting the icing, I kept adding water until a dropped spoonful of icing was incorporated after a count of 15 seconds. I wanted the train cars to have very neat, beautiful edges, so I outlined them first in red, stiff royal icing. Then I went back and filled in them using my red "colour flow" royal icing. The windows were a bit different. i wanted all sides of them to be yellow, so I covered them completely. When they were done, I broke off the sides glued them to the caboose, and then went over them with window panes and shades.

|
|

|
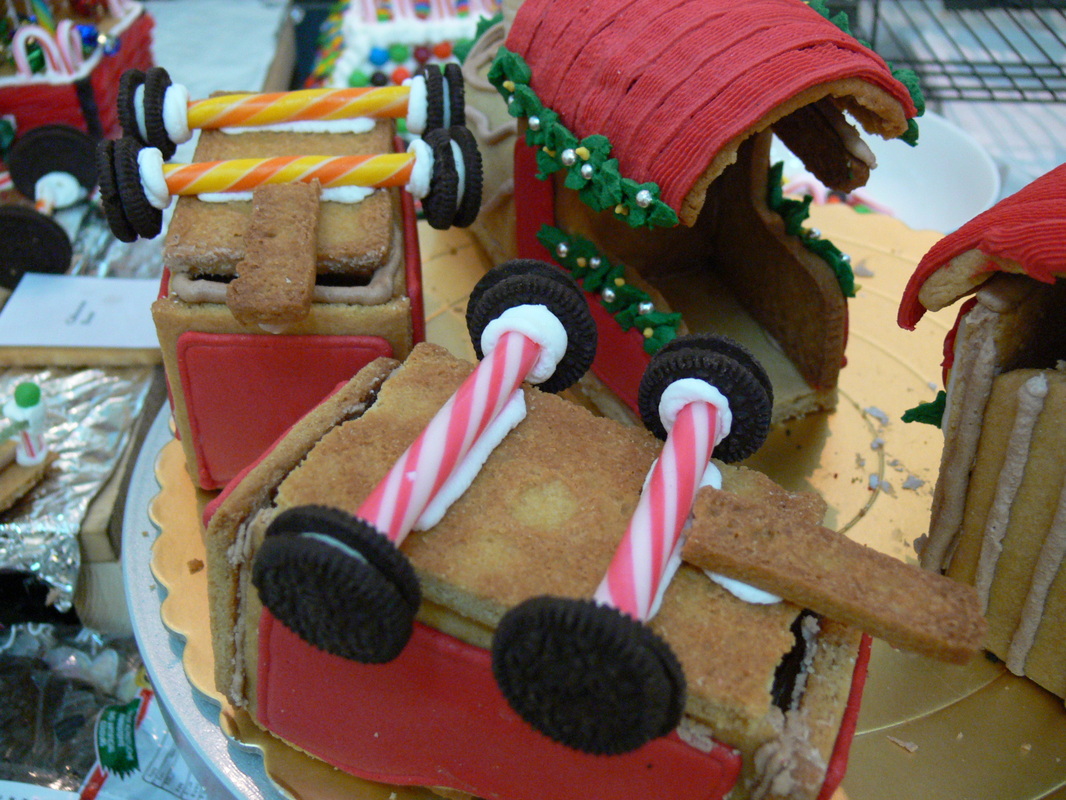
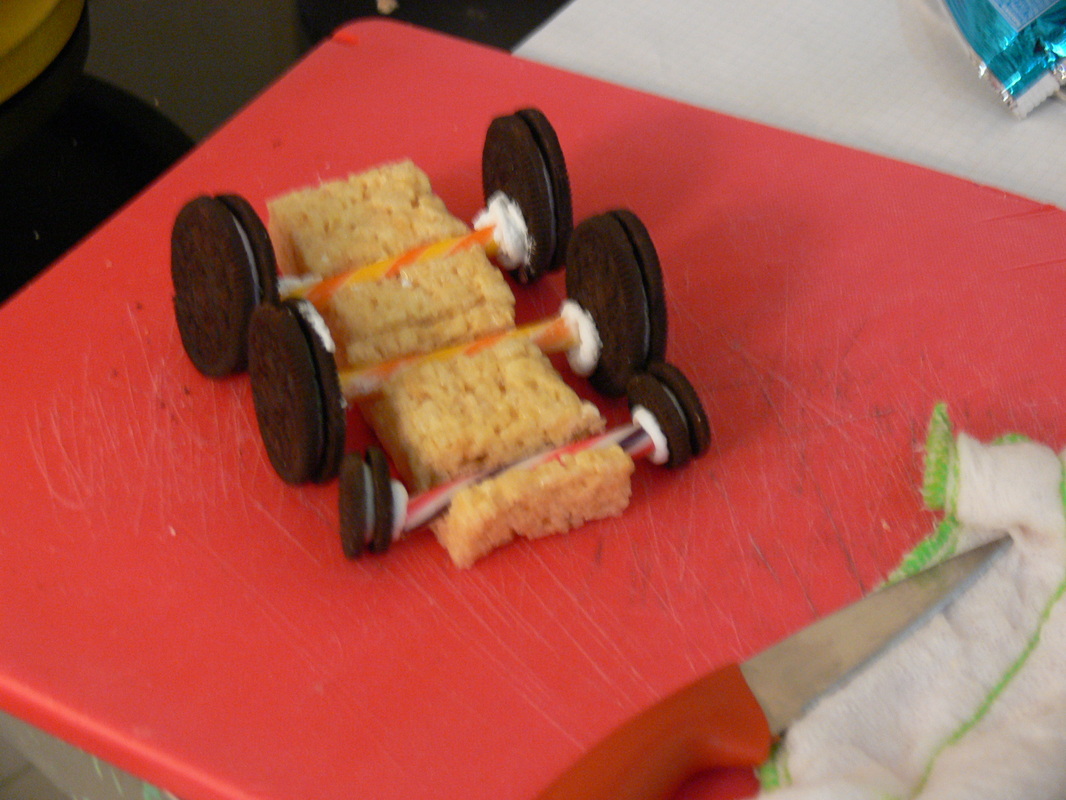
The Train Undercarriages
I followed the directions for the wheels, but with limited success. The little train cars were light enough to support two candy canes and some mini Oreos. No problem. However, it was impossible for to support the train engine or the caboose using little wheels. They kept collapsing and nothing I did could stop them. I even tried making the wheels days ahead and giving them quite a long time to dry. No joy. In the end, my friend Renee suggested using Rice Krispies Squares to create under-carriages. This was very successful. I initially thought they looked pretty ugly. Then I wrapped the under-carriages in chocolate twizzlers so that it looked like they were just part of the normal under-carriage of any vehicle.
|
|

|
Turntable

I needed to have the carriages, engine, and caboose at eye-level and so pulled out my cake turntable. it was a life-saver in many regards. One main reason was the cowcatcher on the engine - Before I had the wheels on, I needed some way of decorating the train, while turning it around, while hanging the cow catcher off the edge.