|
|
|
|
Gingerbread House Tutorial
There is a tradition in my family that we always purchase a candy house from Mrs. Broad every December but that we aren't allowed to eat off it until Christmas Day. A few years ago I got curious and decided I wanted to try making one for myself. As I started researching, I found some really cool gingerbread websites (my two favourite sites are Haunted Dimensions and Gingerbread House Heaven) and decided I wanted to try making one of those first.
I decided to start with the blueprint for Phantom Manor (henceforth known as PM), from Haunted Dimensions, because it looked like a challenge and because it was free. I had a week off school because of Golden Week in China (yes, I live in China) and knew it would be a perfect time to relax and do some baking. So here is my tutorial. Please click on the pictures for larger views.
I decided to start with the blueprint for Phantom Manor (henceforth known as PM), from Haunted Dimensions, because it looked like a challenge and because it was free. I had a week off school because of Golden Week in China (yes, I live in China) and knew it would be a perfect time to relax and do some baking. So here is my tutorial. Please click on the pictures for larger views.
Ginger...ummm... Sugar Dough House.
During Golden Week, it's hit'n'miss whether the shops will be open, so I decided to stock up on all the baking supplies needed. I didn't realise how expensive your typical gingerbread recipe is! When you live overseas, imported foodstuff is super expensive! Before I knew it, I had more than a hundred dollars in my basket. Reading the instructions for the PM, I noticed that the author had used 10 batches. 10 batches! I took one look at my little molasses bottle, and another look at the price tag, and knew this gingerbread house wasn't going to happen. I took my lonely gingerbread dough and stuck it in the fridge, promising myself I'd use it at another time. So what else could I do? Well, sugar doughs aren't as expensive and are just as structurally sound. Sure, butter is also imported, but at least it's in the local supermarket and not in a specialty store. I bought myself enough for 2 batches (please, don't ask me why), and started baking on Tuesday night.
Ingredients and Timeline
8 batches of sugar dough
6 batches of royal icing
What I did:
Tuesday Night: 2 batches of dough
Wednesday: baked all pieces
Thursday: decorated side panels
Friday: Assembled majority of house
Saturday: Finished assembling roof and added finishing touches to the decorating (e.g. pumpkin patch, ironwork, etc.)
Next time, I'm going to slow down and give myself a full two weeks to finish. For example, next time I'm going to bake all the pieces and give them a full day to harden. Then I'm going to decorate and give the icing one full day to harden. Then I'm going to assemble the roofs and give them a full down to harden.
What I Should Have Done:
Saturday: Bake all pieces
Sunday: Pieces dry on the kitchen table
Monday Night: Decorate the side panels and the roof panels
Tuesday Night: Assemble the roofs (tower and main roof)
Wednesday Night: Assemble the main walls
Thursday Night: Attach main roof to main walls
Friday Night: Attach tower roof to main walls
Saturday: Attach porches
Sunday: Accent decorations
Monday Night: Landscaping
If I follow this schedule, the gingerbread will definitely be ready for the following Saturday and everything will always have plenty of time to dry. I think most of my problems came from improper drying. Pieces fell apart because they didn't have time to harden.
How to Roll the Dough
Look. When other tutorials say stuff like, "Lightly dust the rolling pin," I know they are talking about some other baker on some other planet. My doughs stick. Always. Regardless of the recipe. I saw some tutorials showing pictures of perfectly rolled dough already on the baking tin and then having the pieces cut out. Yeah, that wasn't going to happen, either. My baking tins have 5 cm lids! There's no way I could nicely roll a dough inside there. So this is what I did.
1. I bought a non-stick table mat from IKEA and put it down on the table.
2. Next, I put a layer of parchment paper. Yes, imported. Yes, expensive, but definitely an essential.
1. I bought a non-stick table mat from IKEA and put it down on the table.
2. Next, I put a layer of parchment paper. Yes, imported. Yes, expensive, but definitely an essential.

3. I took a blob of the dough and smushed it down with the heel of my hand until it was close to the size of the cut-out pattern. Once it was close, I took two pairs of pencils (taped end-to-end) and put them on either side of the dough. Then I put another layer of parchment paper on top and started rolling. Why pencils? Well, one website said if you have a small gingerbread house, you need to roll out 1/8" of an inch, but if your gingerbread house is more than 6 inches, you need to roll out 1/4" of an inch. Now, I don't understand imperial measurements, but I figured my house was pretty big and I'd need at least 6mm thicknesses. I went to my classroom and searched for any objects that were about that thick and found that HB pencils were around 5mm. Maybe more. By putting the pencils on either side of my dough, I came out with the exact same thickness every time.
4. When the dough was ready, I put the pattern on top and cut away using baking tools. You know the saying, "A poor craftsman blames his tools?" Well, don't underestimate the value of good tools! I bought myself a large off-set spatula and a gum paste tool set and loved them both. I used the gum paste tool to cut the tight corners. The spatula was perfect for three motions - cut, flip up, throw into bowl.
5. The tricky step was getting the dough on to the baking tin. Most tutorials say to put the dough into the fridge to cool it first. I couldn't see that happening. My fridge is really small compared with Canadian fridges, and I knew just moving it to the fridge would be the equivalent of moving it to the tin. If the pieces were small, I scooped them up using the off-set spatula. If they were big, I picked up the bottom sheet of parchment paper (and you can see from my picture, they get greasy fast!) and placed the whole thing on the baking tin. I had two tins going at a time so I could always having something in the oven at any given point in the process.
Disaster: Trimming Too Early then Too Late

Do you see how beautiful it looks? How professional it looks? Wow... beautiful... but not when it came out of the oven. I forgot about expansion, you see, and when these beautiful pieces came out of the oven, the holes were horrible half blobs and all three pieces were melted together. The next time I did it, I waited until 7 minutes, pulled the piece out and tried to cut the windows then. Nope. Second disaster. The dough wasn't cooked enough to hold a shape. Next, I waited a full 14 minutes and then tried trimming the pattern. Nope. Third disaster. The dough was so hard that it broke in cutting.
Lessons Learned:
1. You don't have to have perfection when you are cutting the initial pieces because they warp and expand in the oven anyhow. Save your precision for the after cutting.
2. Wait 12 minutes, pull the pieces out of the oven and do some initial trimming (e.g. windows), then put them back in for 4 minutes more (16 minutes in total).
|
3. Trim as soon as the pieces come out of the oven. My finger tips kept getting burned, so I kept a bowl of cold water beside the cutting board. I dipped my fingers in and then held down the paper as I cut. As soon as my fingers got too warm, I dunked them back in the bowl and then continued.
Here is a picture of my trimmings and my handy bowl of water. I'm going to keep the trimmings in case I ever need a crust for nanaimo bars or a cheese cake. |

|
Disaster: Leaving the Paper On

I put the papers on each piece and took a photo so that I could remember what the different pieces looked like. The problem was that I kept forgetting to take the paper off and cooking the paper onto the pieces! This was all very well for roof pieces because I already planned on covering them completely. However, for side pieces, or for pieces that were very obvious, this was a disaster. As you can see from the photo, pulling off the paper made a horrible rippled look. See the pieces on the bottom? They are gorgeous. Quite a contrast. A friend of mine asked what I was multi-tasking on that I kept forgetting the paper. Answer? Nothing. No TV on. Not emailing. Not on Facebook. I was simply concentrating so much on getting one batch in while rolling out the batch for the second, etc., that I forgot to take the paper off... 4Xs. Yes, I ruined 4 batches.
Glass Windows

Go big or go home. I didn't just want to draw windows onto my house - I wanted to have panes of glass. I researched this on the internet and found some pretty good instructions.
1. Cook for 12 minutes and pull out. Immediately cut out the windows required.
2. Put hard candies into your blender or food processor. If you want stained-glass windows, like a church, then use multi-coloured hard candies like Lifesavers or Jolly Ranchers. If you want clear, normal windows, then use clear mint candies (which is what I did).
3. I put 1 half of a heaping tablespoon of crushed candies into each hole. The first time I did it, I only covered the bottom of each hole, but I found the "panes" did not cover the opening. Next, I made sure the entire hole was completely covered, so that the candies were even with the cooked gingerbread.
4. Put the dough back in the oven for 4 more minutes. When the candies melted down, they were lovely, smooth "panes of glass."

|

|

|
The Inventory

Once all the pieces were done, I did a quick inventory. I laid everything out on my kitchen table, with their labels, and then double checked again the blueprint. Everything was fine, so I was ready to start decorating.
Making & Using Royal Icing

I think one of the best lessons I got out of the Wilton Master Course was knowing the "feel" of an icing. I can't explain it, really. I know how a good icing looks in the bowl and how it feels in my hand. That experience, alone, was invaluable. This is the only way I can really explain it:
Piping: The icing stays on the beater when you pull it out of mixer. When I'm cleaning the sides of the bowl with my spatula, I need to put some "elbow grease" in because it's not all that easy. Even still, the icing looks smooth. Not smooth and silky, but smooth. It *looks* stiff.
Covering: The icing still stays on the beaters when you pull them out, but a bit of it might fall back into the bowl. The icing looks really shiny and smooth. Your spatula can move around the bowl pretty easily. The consistency reminds you of those horrible instant icing mixes you can buy from Betty Crocker. The icing is thin enough that you think, "Yeah, this is easily spreadable with a knife."
Colour Flow: (not used for this project) Colour Flow, just to be clear, is a separate product. However, your royal icing can act like colour flow, and often does. For this, thin your icing with milk or water. A lot. Take a spoon and dip it into the icing, take a spoonful, and then immediately throw it back into the icing. Start counting. If you can count to 15 seconds and the icing is completely incorporated, then you are good to go. If the icing is incorporated too soon, then the icing is too runny. If the icing is incorporated too late, or doesn't incorporate, then your icing is too hard.
Notice I put a picture of a flour sifter on the site? Well, this is extremely important. You really have to sift your powdered sugar before making royal icing. This is annoying. It takes me forever to sift 8 lbs of sugar and I get very impatient. However, if you don't, then your icing won't be nice and smooth and you'll have a lot of troubles when it comes to piping. Here's what I do... I put a clean plastic bag over the shifter. For about 20 seconds, I use the handle to pump out some sugar... then I hit the top with my hand for 20 seconds... then I shake it up and down for 20 seconds... then I hit the side for 20 seconds... then I repeat. I find this saves my hands from cramping and makes the sifting go faster.
A word about piping... I like to ask myself whether I could make a drop string with the icing in my bag. In fact, sometimes I'll test an icing by drawing a series of drop strings on my big mixer. If they hang nicely and attach nicely, then I know I'm go to go. If they are full of holes, or are too runny and fall off, then I know they aren't ready for decorating. After all, as you'll see farther down, I use the leaf tip a lot, and if that icing isn't ready, those leaves aren't going to stand up.
-- Gluing --
I thought I should state the obvious. The pieces are "glued" together with royal icing. The icing is always going to show, so make sure you choose a colour with which you are happy to decorate. If you are doing a Hallowe'en house, you might want black. If you are doing a Christmas house, you might want white. I used tip #12 for all gluing. When I wanted a very thin bead, applied light pressure. When I wanted to cover a very fat area, I applied heavy pressure.
|
Also, put a wet tea towel over your mixture at all times to stop the icing from getting hard. Likewise, keep another wet tea towel covering your piping bags and your used piping tips. There's nothing more annoying than having to constantly run to the sink to wash out your tips because you've left them uncovered. If you've left them under a damp tea towel, they'll always be ready to go if you use the same colour.
|

|
Decorating the Panels

When I was researching on the internet, I learned that it's better to decorate your panels beforehand if you plan on doing something complicated. For example, I saw one really beautiful Christmas gingerbread house that was done entirely in Cornelli Lace. Wow. That would have been extremely difficult from a standing position, especially with gables, etc. So in that case, it made sense to decorate beforehand.
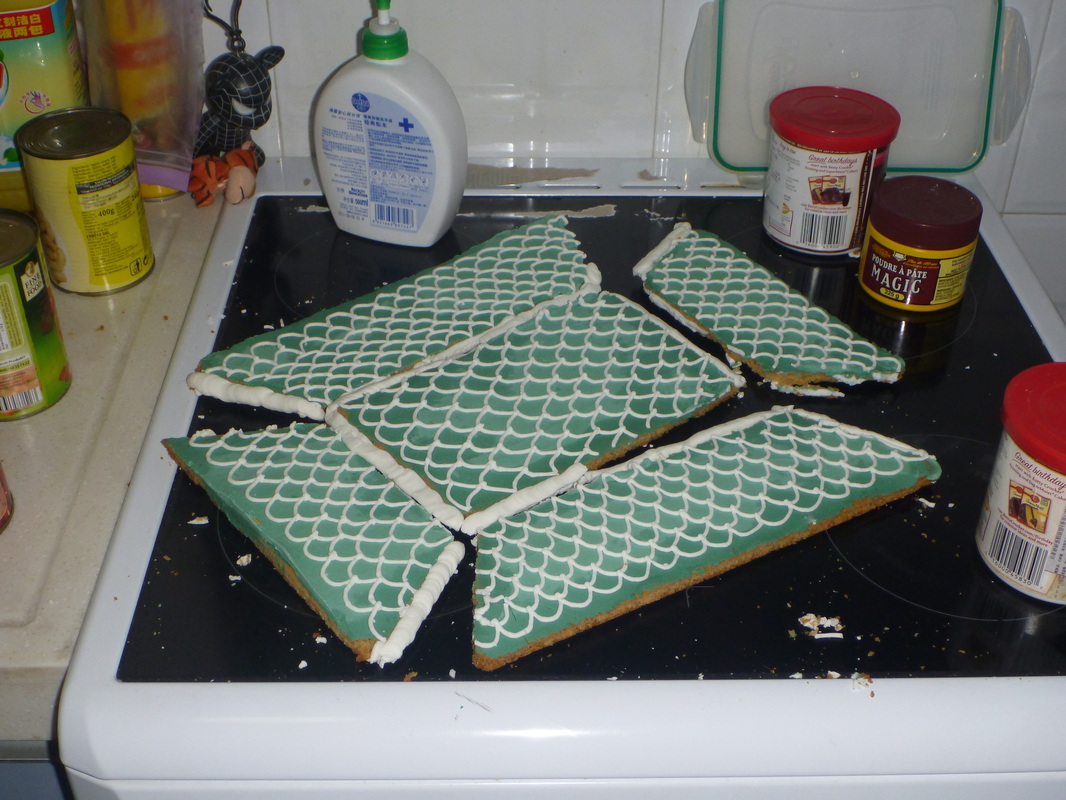
I looked up Victorian windows on images.google.ca to get a feeling for what my windows could look like. Initially, they looked like this (see picture left). However, after a while I started getting a bit fancier with them. I added shells and and white stars to some of the windows.
I looked up Victorian windows on images.google.ca to get a feeling for what my windows could look like. Initially, they looked like this (see picture left). However, after a while I started getting a bit fancier with them. I added shells and and white stars to some of the windows.
|
I decided to pre "paint" the roof panels as well, since I'd noticed that almost every gingerbread house on the internet has a coloured roof-top. I choose green because I like the way tin roofs turn green after may years exposed to weather (I'm thinking of Elsinore Castle in Denmark and the Parliament Buildings in Ottawa). There's where I made another mistake. I was careful to colour the panels before they were assembled, but I decided to decorate them (with the white royal icing) once assembled, and that was really a pain in the butt. If I were to do it again, I'd both ice and decorate in one go. Then I'd leave the panels for over 24 hours to make sure they were *really* hard.
|

|

|

|

|
A Repair

The corner broke off my main roof panel and in a really weird way. I was a bit stumped, trying to figure out how to fix it. Then I realised I could simply cut a straight line out of the main roof and from a matching bit of leftover cookie and glue them together. Once I had iced the entire panel, it was super strong. The funny thing is that when I was putting the roof together, and the pieces were really wobbly and kept breaking, this repaired piece was the strongest of the lot.
Disaster: The Roofs

The tower roof was surprisingly easy to assemble and stayed together very well. I simply propped it up using canned foods. It never fell once. I think this is what gave me my sense of false security -- the main roof fell 5 times before I got it to stay. Super frustrating.
The main roof was the bane of my existence. It was my arch nemesis. Sure, it looked beautiful, but it kept falling. I'll tell you the secret, though, of *why* it kept falling -- I kept touching it. If I just left it alone, it would have been fine. However, I kept thinking, "Hey, it's been an hour, let's check on it..." and down it went. I once it let go 5 hours and yet it still collapsed. The biggest problem was that every time it fell, the decorating chipped. By the 6th time assembled, the edges of this previously beautiful roof were cut-up and ragged. I had to pipe two lines of icing to try and cover as much as I could. I also added a vine running up from the back panel, which looked beautiful but which also covered a very large crack. So how did I get it to stay in the end? I let it harden for about 15 hours straight.
The main roof was the bane of my existence. It was my arch nemesis. Sure, it looked beautiful, but it kept falling. I'll tell you the secret, though, of *why* it kept falling -- I kept touching it. If I just left it alone, it would have been fine. However, I kept thinking, "Hey, it's been an hour, let's check on it..." and down it went. I once it let go 5 hours and yet it still collapsed. The biggest problem was that every time it fell, the decorating chipped. By the 6th time assembled, the edges of this previously beautiful roof were cut-up and ragged. I had to pipe two lines of icing to try and cover as much as I could. I also added a vine running up from the back panel, which looked beautiful but which also covered a very large crack. So how did I get it to stay in the end? I let it harden for about 15 hours straight.

|

|
|
The Main Building Assembly
After all the trauma I had with the main roof, I was truly dreading putting together the house itself. The instructions are really clear, but it's evident from the blueprints just how involved and elaborate this house is. If I couldn't put together the roof, how was I going to put together the rest of the house? Well, the truth is the rest of the house was really easy. Okay, not the porch. I'm talking the main walls, side porch, and tower. Even attaching the roofs was really easy. I hardly needed the cans at all - everything just stayed where it was supposed to.


|


|


|
Disaster: The Big Crack
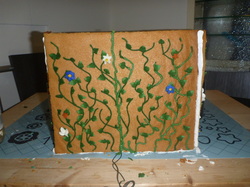
Remember I was saying how easy it was to put together the main building? Well, my back panel cracked right down the middle when I was putting it up! It was already decorated with vines, of which many promptly fell off when the right side of the panel fell onto the table. But don't worry, there is always a silver lining in life. I glued it using the same dark green icing, pretending that it was a vine. The vines that fell off had royal icing leaves that all survived. I ended up saving those leaves and using them all over the house. You might notice in one of the pictures I have a crack up the right side of the front door. No problem! Put a vine running up there and one of those leaves. There's a crack on the back of the main roof? No problem. Put another vine there and one of those leaves. It almost made me think that I should just pipe a bunch of leaves and always have them ready for any project.
Troubleshooting the Lights

I went to IKEA for lights, but they all cost 99 RMB ($15 CDN) and barely gave off any light. I needed true Christmas lights, without frosting, that would throw off a lot of light. My friend and I happened to be in a local Chinese market and found strands for 2 RMB ($0.31 CDN). The strand is so thin that I didn't need to worry about cutting a hold in the back panel. I happily ran the cable, plugged it in, and then gasped in dismay. You see, the bottom tower is independent of the main building, so putting the lights in the main building didn't light up the bottom tower. I stewed over this for a while, then went out for dinner with a friend, all the while mulling the problem over in my head. The solution was simple - I just ran the cable up and over the top of the tower. This also solved the problem of the lights staying at the bottom of the house and distributed the lights better. Of course, one problem was never solved -- No matter what I did, I couldn't get light into the top of the tower. The only solution would have been drilling a hole in the main roof to run lights up and into the tower. However, I had just finished my 6th time assembling that roof and there was absolutely no way I was going to start drilling into it for the sake of one light. My friend said, "Ah, there's no one in the attic at the moment. Everybody is on the 1st and 2nd floor." Yes, that's it. Lesson learned: Before you start baking your pieces, have a plan of where your lights are going to go. That way when the pieces are still hot out of the oven, you can cut your holes where you are planning to run your lights. Make a plan first so that you don't have to react second.
Piping the Ironwork

I initially wanted ironwork around both the tower and the main roof top. I measured how long I would need and how tall, proportionally to the building. This led me to having 3 X 5 cm for the tower roof, 3 X 12 cm for one side of the main roof, and 3 X 21 for the other side of the main roof. I went on iStockPhoto and found a good picture of a wrought iron fence to be copied. I "live traced" it using Adobe Illustrator and then fit it to fit my dimensions. Then I printed out the images on an A3 paper, placed the paper under some parchment paper, and started piping. For this, I had to make sure my icing was really stiff. I treated each line like it was a drop string.
Drop Strings: I love drop strings. They drove me crazy during the Wilton Master Class, but now they are my best friends. They are a little counter-intuitive, though. First, squeeze your piping bag at the top of where you are piping. Next, slightly lift your piping bag up and squeeze in the air as you move the bag in the direction you want. Notice that you are not dragging because you are not touching the surface of the table. Your icing is hanging in the air and you are squeezing in a direction. When your tip is hovering over the end point, put your tip down and attach. This will make sure that your lines are perfectly straight and smooth. Warning -- To do a good drop string, make sure there's no air pockets in your bag and that there's no tiny, *tiny* air pockets in your icing. So, make sure you remix your icing before filling your piping bag and that the icing looks good and stiff, without miniscule air pockets. When you fill your piping back, squeeze out a portion of the bag until your bag has a bit of a "fart" or a burb. Squeeze again until some icing comes out. Right. Now you are ready to go.
Why didn't I use all my ironwork? Because I was in too much of a hurry. After 6 days, I was getting sick of this gingerbread house and I just wanted it finished. I lifted up the ironwork before it was completely dried and a lot of it broke. Also, my panels were too big. Next time, instead of doing 5 or 6 panels in one, I'm going to do the panels in groups of 2 and then simply line them up side-by-side. Having panels too long, that were too fragile, was simply a recipe for breakage.
Disaster: The Porches
To be honest, I'm still not 100% convinced about the porches. I'm afraid to move the gingerbread house off my kitchen table because it is probable that the porches will immediately fall off. Don't get me wrong - the side porch was a piece of cake. It went up so easily that I think I got a bit cocky about it. The big, main porch was one of the first items decorated but the last to be attached, so it was hard as rock. I was really pleased with it. I think, though, that because I was so confident in its strength, that I didn't handle it as gently as I should have. It broke in my hands and I had to take many deep breaths.
Problems with the porches:
1) I couldn't get the pretzels to be the exact height needed and so the porches were lopsided. For example, I would think that the porch was secure, not realising that one of the pretzels was too short, and then the porch would fall off and crumble a bit.
2) The porches didn't fit the main building exactly. This is because some of the coloured icing went over onto the edge and so the edges weren't perfectly smooth. The gluing icing did meet in some places, but not in others.
3) The main porch was too long and complicated for such a thin, delicate piece. Both the bottom and top portions of the porch broke in the exact same places. If I ever use this blue print again, I'm going to purposely cut the porches in such a way that they are two independent pieces that can be handled separately.
In the end, the main porch became two. They aren't the nicest porches I've ever seen. Like the main roof, they've seen their share of wear'n'tear from being constantly dropped, changed, glued, unglued, etc.

|
|

|
Landscaping: The Big After-Thought
It's sad, but I was so focused on teaching myself how to build a gingerbread house that I didn't even bother with landscaping. When the house was done, I look a long, satisfying look at it and thought, "Shoot...! What am I supposed to do now! It's sitting on a blue IKEA no-slip mat!" I knew the landscaping wasn't going to be great, but it had to be something... In the end, I used some royal icing flowers that I had saved from my panda cake. I tinted some royal icing light brown and spread that beside four mini waffles. Then I put Oreo cookies into a blender to crush them and laid them out, like a flower garden. Then I put some of my royal icing flowers and piped some leaves. Now, I know what you are thinking... "Those are MASSIVE flowers! Are they proportional to the house?!" Well, yes they are... if you are one of those farmers who grows the ginormous gourds for county fairs. Having a bit more inspiration, I created a pumpkin patch. I bought some material in a Chinese baking shop (which is a bit of a novelty, since Chinese don't bake... most don't own ovens) that they claimed was fondant. Tinted it orange using red and yellow. Then I took my handy fondant modeling tools to create some pumpkins. Two of the pumpkins were placed to hide my horrible porch. The rest were nicely placed in the pumpkin patch. I wonder whether "The Great Pumpkin" will be visiting this year?

|

|

|
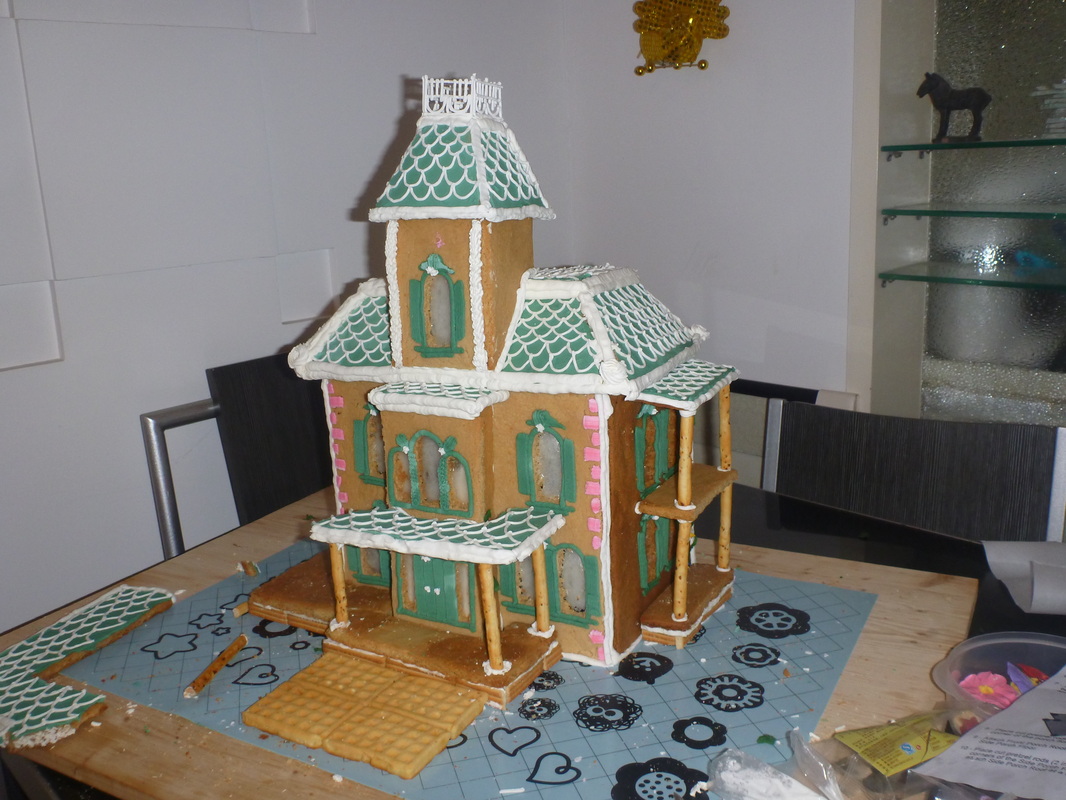
The Finished Pictures
Here is the finished result. I'm proud of it. I could never sell it or raffle it off because it's got too many chinks in it. The roof and porches were dropped too many times. I think I might take it to the Canada Thanksgiving party this weekend. The point, for me, is that I wanted to know how to make a gingerbread house. I wanted a week when I could fail (and I did) and try again (and I did). I wanted to know roughly how long it would realistically take for one person to do it alone. I wanted to know hints and tricks to remember for next time. I think this experiment was very successful. Please view my slideshow below of the finished products.
|
|